Migrations
Overview
For Trader Core, migrations should be stored as part of the module they relate to. This ensures each module takes responsibility for maintaining it's own migrations as they change over time.
See MS documentation Migrations Overview for details about generating and applying migrations.
Generating and Applying migrations
For modules within the solution the migrations can be generated via the following tools (as per the MS documentation):
.Net Core CLI
For Example, using the .Net Core CLI:
- Change directory to folder that contains the Trader.Core.Host
.csprojfile or the Host project for your implemention. - Use the
dotnet ef migrations add YourDbContext_DescriptionOfChange --context YourDbContext --project ..\Modules\ModuleName\src\Trader.Core.ModuleName\Trader.Core.ModuleName.csprojto generate the migration. - Use the
dotnet ef database update --context YourDbContextto apply the migration to your current database.
Tip
From your API project folder use dotnet ef to confirm EF tools are installed.
Package Manager Console
For Example, using the Package Manager Console:
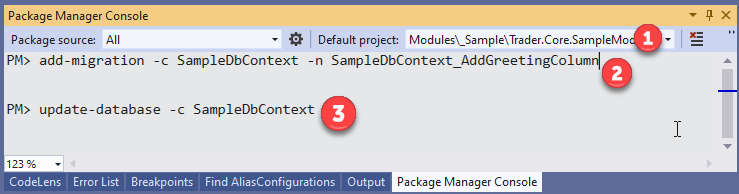
- Set the default project dropdown to the module you are working on.
- Use the
add-migration -context YourDbContext -name YourDbContext_DescriptionOfChangeto generate the migration. - Use the
update-database -context YourDbContextto apply the migration to your current database
Caution
Check that Trader.Core.Host is set as the Startup Project, and your module is referenced in API project.
Generating a new database for a Trader implementation
To generate a new database for a Trader implementation first set the connection string in the developer app settings file and then use the trader-sql-migrations.ps1 powershell script in the Trader tools folder to generate the script to create the database.
trader-sql-migrations.ps1 .\trader.core.host.csproj c:\temp\migrations\
After generating the _combined-script.sql script open MS SQL Server Management Studio and execute the script.
Generating a SQL script to apply your migrations as part of the build and release pipeline
The following Power Shell script is a sample of a script that can be added to your build pipeline to generate a SQL script to apply migrations as part of your release. The steps are:
- Retrieve a list of all DbContext instances in your API
- Iterate over each DbContext and generate the migration SQL script for that DbContext.
- Append that script to a global SQL script that represents all migrations for your application (including Core framework modules).
The final generated script _combined-script.sql can then be executed in your release pipeline.
Important
The script will have to be tailored for your implementation. You should ensure you understand what the script is doing and update it as required.
$project = 'YourProject.API.csproj'
$output = '$(build.artifactstagingdirectory)\Migrations\'
$fullScriptName = -join($output, "_combined-script.sql")
$dBContextList = dotnet -d ef dbcontext list --project $project --prefix-output

foreach ($dBContextItem in $dBContextList) {
if ($dBContextItem -like 'data: *')
{
    $dBContext = $dBContextItem -split "data:", 2
    $scriptName = -join($output, $dBContext[1].ToString().Trim(), ".Script.txt")

    dotnet ef migrations script --idempotent --project $project --no-build --output $scriptName --context $dBContext.Trim()
    Get-Content -Path $scriptName | Out-File -FilePath $fullScriptName -Append
}
}